Aroid Potting Mix Recipe
An aroid soil mix recipe creates a loose, chunky potting substrate designed for tropical plants such as Monstera, Philodendron, Anthurium, and Alocasia. Instead of dense garden soil, aroid mixes use structural ingredients like orchid bark, perlite, coco coir, and worm castings to maintain airflow around plant roots while still holding enough moisture for steady growth.
This guide breaks down an aroid potting mix recipe into simple parts so you can build a chunky, airy substrate at home.
Aroids evolved in tropical forests where roots grow through decomposing plant matter, bark, and organic debris rather than compact soil. Because of this, they perform best in potting mixes that mimic those natural conditions. A properly built aroid soil mix recipe provides three critical root-zone conditions: oxygen availability, controlled moisture retention, and structural stability that prevents soil compaction.
Growers often describe the ideal aroid substrate as chunky soil. Chunky potting mixes contain larger particles that create air pockets throughout the root zone. These air pockets allow oxygen to move through the substrate while excess water drains away, preventing the root rot and compaction problems common in traditional potting soils.
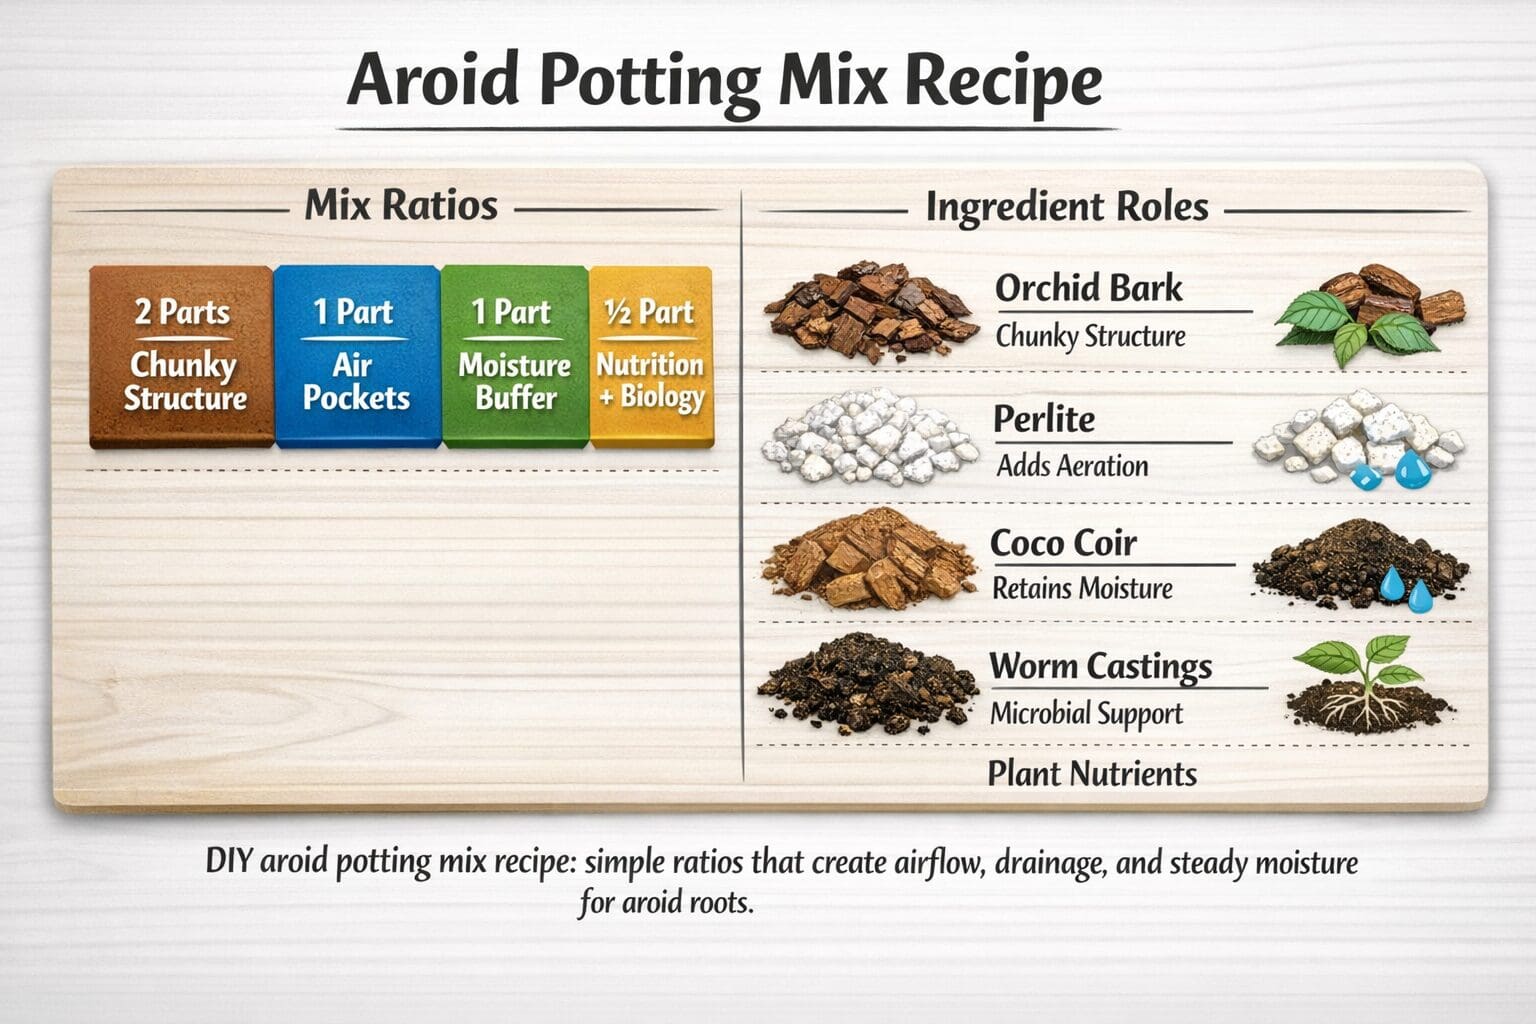
This diagram illustrates a simple structural recipe used by many tropical plant growers. While ingredient ratios can vary depending on climate and pot type, most successful aroid soil mixes follow the same general principle: combine coarse structural components with lighter aeration materials and moderate moisture-holding ingredients.
The aroid potting mix recipe ratio shown above is designed to keep roots oxygenated while still holding steady moisture between waterings.
A typical chunky aroid soil recipe uses the following structure:
- Orchid bark as the primary structural component that keeps the substrate loose and prevents compaction.
- Perlite or pumice to increase aeration and create stable air pockets.
- Coco coir or peat-based material to hold moisture between waterings.
- Organic nutrition sources such as worm castings to provide microbial activity and mild nutrients.
Together, these ingredients form a substrate that drains quickly but still supports root hydration. This balance is essential because tropical plants dislike constantly wet soil but also suffer if the root zone dries out too quickly.
Understanding how aroid roots grow helps explain why chunky soil works so well. Many aroids naturally grow as epiphytes or hemiepiphytes in rainforest environments. Their roots travel through layers of bark, moss, and decomposing leaves rather than dense mineral soil. Those environments are constantly aerated and rarely compacted.
When these plants are placed in traditional potting soil, the substrate often becomes too dense after repeated watering. Over time, small particles settle together and reduce airflow through the pot. This can trap excess moisture around the roots and increase the risk of fungal pathogens.
A properly structured aroid soil mix prevents these problems by maintaining pore space throughout the substrate. Even after repeated watering cycles, chunky particles continue to create channels where oxygen can move freely through the soil.
This is why many growers switch to chunky mixes when growing tropical foliage plants indoors. By improving airflow and drainage, the substrate helps stabilize watering cycles and encourages healthier root systems.
If you are new to chunky substrates, it may take a few watering cycles to adjust. Because the mix drains faster than standard potting soil, plants are typically watered more thoroughly but less frequently. The goal is to soak the substrate completely and then allow excess moisture to drain away so air can re-enter the root zone.
Learning how to build the correct soil structure is one of the most important steps in successful tropical plant care. A well-designed aroid soil mix recipe helps prevent overwatering issues, encourages strong root development, and supports steady plant growth.
Many growers prefer to mix their own soil at home, while others use pre-blended chunky substrates. For example, premium blends such as
Rainbows & Unicorns Aroid Potting Mix follow the same structural principles used in DIY mixes, combining multiple ingredients to maintain long-term aeration and moisture balance.
If you are still deciding whether chunky substrates are right for your plants, you can also compare how these mixes behave against traditional soils in our guide to
chunky aroid mix vs potting soil. Understanding the structural differences between the two helps explain why many tropical plant growers switch to chunkier substrates over time.
For readers who want to explore the topic further, our full guide to
aroid potting mix explains the role of soil structure, drainage behavior, and root aeration in greater detail.
In the next section, we will walk through the complete step-by-step process for making your own aroid soil mix at home, including the tools you need, the correct mixing order, and how to identify the ideal chunky soil texture for tropical plant roots.
How to Make an Aroid Potting Mix Recipe
To make an aroid potting mix recipe that performs well long-term, focus on mixing order, particle size, and avoiding excess fine material.
Once you understand the structure of a chunky aroid substrate, the next step is learning how to mix the ingredients correctly. Making your own aroid soil mix is straightforward, but the order of mixing and the particle size of each ingredient play an important role in the final structure of the substrate.
The goal is not simply to combine ingredients randomly. Instead, you want to build a substrate that maintains long-term airflow while still retaining enough moisture to support healthy root hydration. When mixed correctly, an aroid soil mix recipe creates a loose root environment that mimics the organic debris layers where tropical aroids naturally grow.
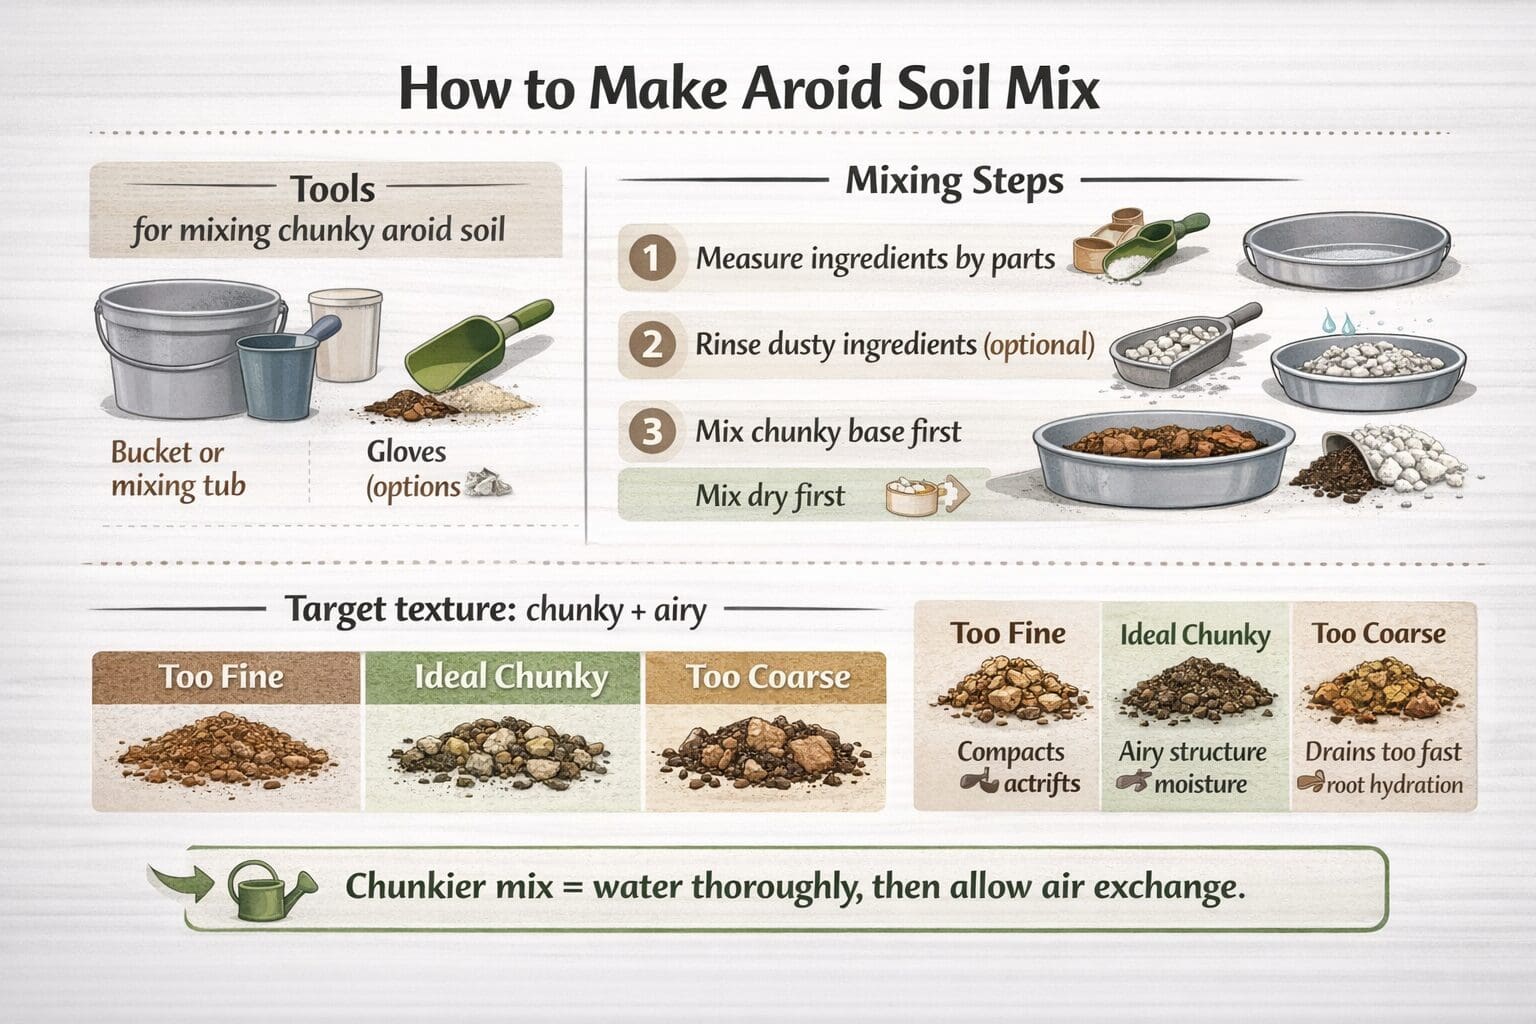
This infographic shows the overall process used by many tropical plant growers when preparing a chunky soil mix. The key concept is building the structural base first and then gradually incorporating aeration and moisture-retention ingredients so the substrate remains evenly distributed.
Tools Needed for an Aroid Potting Mix Recipe
Before mixing the ingredients, it helps to prepare a few simple tools. Most growers mix soil in small batches using common gardening containers. The process does not require specialized equipment.
- Mixing bucket or tub – Used to combine the substrate ingredients.
- Measuring container or scoop – Allows you to measure ingredients by parts rather than exact weight.
- Hand scoop or small shovel – Helps evenly distribute chunky materials.
- Gloves (optional) – Useful when working with bark or soil components.
- Mesh screen or sifter (optional) – Can remove fine dust from bark or perlite if needed.
These simple tools allow you to prepare soil mixes consistently. When creating a recipe, most growers measure ingredients by “parts” rather than strict volume. For example, one scoop of bark, one scoop of perlite, and one scoop of coco coir may represent the base structure of a small batch.
Step 1 — Measure Ingredients by Parts
The first step in making an aroid soil mix is measuring each component according to the desired structure. A common chunky recipe may include two parts orchid bark, one part perlite or pumice, one part coco coir, and a smaller portion of worm castings.
Measuring ingredients by parts allows you to scale the recipe easily. Whether you are mixing a small batch for a single plant or preparing a larger quantity of soil for multiple pots, the ratios remain consistent.
This method is widely used because it prioritizes structural balance rather than exact weight measurements. What matters most is maintaining the correct relationship between structural ingredients and moisture-holding materials.
Step 2 — Rinse Dusty Components (Optional)
Some soil ingredients, particularly perlite or bark, may contain small amounts of dust from packaging and transport. While this dust is not harmful, removing excess fines can help maintain better soil aeration.
If desired, growers sometimes rinse perlite, pumice, or bark lightly before mixing. This step is optional and often depends on the quality of the materials used.
Removing excess dust helps ensure the substrate remains loose and airy after watering. Fine particles can sometimes settle between larger pieces and slightly reduce airflow through the soil structure.
Step 3 — Mix the Chunky Structural Base
The most important part of an aroid soil mix recipe is the chunky structural base. This typically consists of orchid bark or similar coarse organic material. Bark pieces create the framework that prevents soil compaction over time.
Start by adding the bark component to your mixing container. Then incorporate other coarse materials such as pumice or perlite. Mixing these ingredients together first allows the structural elements to distribute evenly throughout the substrate.
Building the base structure before adding finer materials helps prevent dense pockets from forming in the soil.
Step 4 — Add Aeration Components
After the structural base is mixed, aeration ingredients can be incorporated. Perlite, pumice, or similar materials increase oxygen movement through the substrate by maintaining stable air pockets.
These components are particularly important for indoor plants grown in containers where airflow is limited compared to natural outdoor environments.
Proper aeration helps prevent excess moisture from remaining trapped around plant roots. This improves root respiration and reduces the risk of rot caused by stagnant water.
Step 5 — Incorporate Moisture-Retention Ingredients
Once the chunky base is evenly distributed, ingredients that retain moderate moisture can be added. Coco coir is commonly used because it absorbs water while still maintaining good structure.
This component helps balance the fast drainage created by bark and perlite. Without a moisture buffer, the substrate may dry too quickly between watering cycles.
Adding coco coir or similar organic material ensures that plant roots remain hydrated while still benefiting from the aeration created by chunky soil particles.
Step 6 — Add Nutritional Components
The final step in mixing an aroid soil recipe is incorporating mild organic nutrients such as worm castings. These ingredients introduce beneficial microbes and provide a small amount of natural fertility.
Unlike garden soil, container substrates typically contain limited long-term nutrients. Worm castings help improve microbial activity within the soil while supporting early root growth after repotting.
Only a small amount is needed. The goal is not to create a heavily fertilized soil but rather to support a biologically active root environment.
Identifying the Ideal Chunky Soil Texture
After mixing the ingredients together, the final substrate should appear loose, airy, and uneven in particle size. The ideal aroid soil mix contains a combination of medium and coarse particles rather than uniform fine material.
If the mixture appears dusty or compact, it likely contains too many fine particles. On the other hand, if the soil contains only very large bark pieces with little moisture retention, it may dry too quickly.
The ideal chunky texture sits between these extremes. The substrate should drain quickly while still holding enough moisture to support plant roots.
This balance allows water to move freely through the pot while maintaining small pockets of hydration within the root zone.
If your aroid potting mix recipe looks muddy or compresses easily, remove fines and increase chunky structure before potting up valuable tropical plants.
Many growers eventually choose to use professionally blended substrates once they become familiar with the structure of chunky soil mixes. For example, mixes like
Rainbows & Unicorns Aroid Potting Mix are formulated to maintain this same balance of aeration, moisture retention, and long-term structure.
If you are still learning about chunky substrates, our guide to
chunky aroid mix vs potting soil explains how particle size and soil structure affect root health.
You can also explore our full guide to
aroid potting mix to learn more about the role of substrate structure in tropical plant care.
Once your soil mix is prepared, the next step is using it correctly during repotting and understanding how watering practices change when plants are grown in chunky substrates. In the next section we will cover how to repot tropical plants using aroid soil mix and how to manage watering cycles to maintain healthy roots.
How to Use Aroid Soil Mix When Repotting Plants
Once your aroid soil mix recipe is prepared, the next step is using it correctly when repotting tropical plants. Proper repotting technique ensures the chunky substrate maintains its structure and allows roots to establish quickly within the new soil environment.
Repotting is an important part of tropical plant care because container soils gradually break down over time. As organic materials decompose, the soil structure can become denser and less aerated. When this happens, water may drain more slowly and oxygen availability around the roots may decrease.
Refreshing the substrate with a properly structured aroid soil mix restores airflow and improves the overall root environment for the plant.
When to Repot Plants Into Aroid Soil Mix
Most tropical houseplants benefit from repotting every 12–24 months depending on their growth rate and the stability of the soil structure. Fast-growing plants such as Monstera or Philodendron may require repotting more frequently, especially when roots begin filling the container.
Common signs that a plant may need repotting include:
- Roots growing out of drainage holes
- Water draining unusually slowly through the pot
- Soil becoming compact or dense
- Reduced plant growth despite proper light and watering
- Roots circling heavily around the inside of the container
When these conditions appear, refreshing the soil with a chunky aroid mix can dramatically improve the root environment.
Steps for Repotting With Aroid Soil Mix
Repotting tropical plants into chunky soil is a straightforward process. The key goal is to support the roots while preserving the airy structure of the substrate.
Step 1 — Remove the plant from the existing container.
Gently remove the plant from its pot while supporting the root ball. If the plant is root bound, lightly loosen the outer roots so they can grow outward into the new substrate.
Step 2 — Remove excess compacted soil.
If the old potting soil has become dense or waterlogged, gently shake away loose material from the root system. This allows fresh aroid soil mix to surround the roots evenly.
Step 3 — Add a base layer of chunky substrate.
Place a layer of the prepared aroid soil mix into the bottom of the new pot. This base layer supports the plant at the correct height and allows roots to expand into fresh substrate immediately.
Step 4 — Position the plant in the center of the pot.
Hold the plant upright while filling the container with additional chunky soil mix around the root ball.
Step 5 — Fill gaps with substrate without compressing.
Allow the chunky soil to settle naturally around the roots rather than pressing it down firmly. Compressing the substrate can reduce the airflow that chunky mixes are designed to provide.
Step 6 — Water thoroughly.
After repotting, water the plant until water drains from the bottom of the pot. This helps settle the soil around the roots and ensures the substrate is evenly hydrated.
How to Water Plants Growing in Chunky Aroid Soil
Watering plants grown in chunky aroid substrates is slightly different from watering plants in traditional potting soil. Because the mix drains faster and contains more air pockets, watering cycles tend to follow a different rhythm.
The general approach is to water thoroughly and then allow the substrate to partially dry before watering again.
This cycle allows oxygen to re-enter the soil between watering events, which is essential for healthy root respiration.
Instead of frequent light watering, it is better to water deeply and allow excess moisture to drain away.
Chunkier mixes often dry slightly faster than dense soils, but the improved airflow around the roots typically results in healthier plant growth over time.
If you want to learn more about watering methods for chunky substrates, our guide to
how to water chunky aroid mix explains watering cycles and moisture management in greater detail.
Common Mistakes When Making Aroid Soil Mix
Although chunky soil mixes are relatively simple to prepare, a few common mistakes can affect their performance.
Using soil that is too fine
Adding too much fine material such as peat or compost can reduce aeration. Fine particles fill the air spaces between chunky ingredients and may lead to compaction over time.
Using soil that is too coarse
On the opposite end, a mix containing only large bark pieces may drain too quickly and struggle to maintain moisture between watering cycles.
Over-compressing the soil when repotting
Chunky substrates are designed to maintain natural pore space. Pressing the soil firmly around the roots can collapse these air pockets and reduce airflow.
Using containers without drainage holes
Proper drainage is essential when using chunky soil mixes. Pots should always allow excess water to exit the container so oxygen can return to the root zone.
Why Chunky Soil Improves Root Health
The main advantage of an aroid soil mix recipe is the improvement in root-zone aeration. Plant roots require oxygen to perform cellular respiration, which is essential for nutrient absorption and growth.
Dense soils can sometimes hold water for long periods, reducing oxygen availability around the roots. When oxygen levels drop, root tissues may become stressed and more susceptible to pathogens.
Chunky substrates prevent this issue by maintaining open channels throughout the soil structure. These channels allow water to move through the substrate quickly while still retaining small pockets of moisture.
This balance between drainage and hydration is what allows tropical plants to thrive in container environments.
For growers who prefer a ready-to-use solution instead of mixing their own soil, professionally blended substrates such as
Rainbows & Unicorns Aroid Potting Mix follow the same structural principles used in DIY mixes.
These types of substrates combine multiple ingredients to maintain long-term aeration while still supporting healthy moisture retention for tropical plants.
Extension guidance on container growing media also emphasizes combining moisture-retaining components with drainage and aeration materials to keep mixes loose and porous (UF/IFAS container media overview).
Frequently Asked Questions About Aroid Soil Mix
What is the best soil mix for aroids?
The best soil mix for aroids is a chunky substrate that includes structural ingredients such as orchid bark, aeration materials like perlite or pumice, moderate moisture-retention components such as coco coir, and a small amount of organic nutrition like worm castings.
Can I use regular potting soil for aroids?
Regular potting soil can work temporarily, but it is often denser than ideal for tropical plants. Many growers switch to chunky substrates because they provide better airflow and drainage around plant roots.
How often should I replace aroid soil mix?
Most chunky substrates remain structurally stable for 1–2 years depending on the ingredients used and watering frequency. Repotting when the soil begins to break down helps maintain healthy root conditions.
Is chunky soil better for Monstera and Philodendron?
Yes. Many tropical aroids naturally grow in environments filled with decomposing bark and organic debris rather than dense soil. Chunky substrates help replicate those natural conditions.
Related Aroid Soil Guides
- Best Soil for Monstera
- Best Soil for Philodendron
- Chunky Aroid Mix vs Potting Soil
- How to Water Chunky Aroid Mix
If you want a deeper understanding of tropical plant substrates, our complete guide to
aroid potting mix explains how soil structure, drainage behavior, and root aeration influence plant health.
Understanding the science behind chunky substrates allows growers to create healthier root environments and maintain stronger tropical plants indoors.